

It’s been a fairly prolific year, at least in the number and range of projects I completed this year. Naturally, I have my own definition of “completed”!
Keeping an eye on things
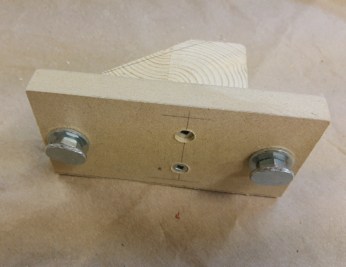
Outside, I replaced the temporary installations of two video cameras which had been put in place with the equivalent of duct tape and prayers. Actually, the initial camera install was quite ingenious. I wanted to leave it in place for long enough to be sure of the field of view, without damaging the brickwork in case it had to be moved. So I created a wooden bracket with two bolts that twisted when tightened so they would wedge their heads in the gap between two bricks. With the location firmed up, the challenge was to get USB-level power to the camera tidily. That is, not running along the bricks on the outside. My first thought was to cut a USB cord, thread it through a small hole, re-join the two ends inside, and plug it into a USB power brick. Except that the join didn’t work; boy, those are tiny wires inside a USB cable! I did the cable join experiment down on the ground, by the way, it was fiddly enough without doing it at the top of a ladder.
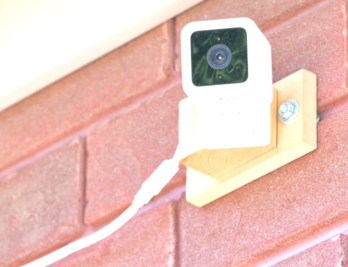
To make a long story short(er) I drilled a hole big enough for the smaller plug on the cord to go through, and plugged the gaps afterwards. There was a mild panic when the sharpened rod I was using as a drill to reach through to the inside didn’t emerge where I thought it should, but the sharp-eyed site supervisor pointed out that I was aiming right at a piece of framing, not the open spot I was hoping for. I got the (unmodified) USB cord threaded through the OSB and the brickwork, attached the camera permanently, tidied up the wiring and it all worked. Well, except for alerting us every time a car’s headlight beam swept across the driveway!

The back camera was a lot simpler. The temporary install used an extension cord to get power close, and then the USB brick was protected under a plastic sheet. I chose to make weather shield for the outdoor plug, put the USB brick in the shelter and run a 15’ USB cord up to the camera. This was neater and safer, and also protects the outdoor plug from the worst of the weather when it’s running the pool waterfall pump in summer and some Christmas lights at this time of year. Plus it used up some cedar boards salvaged from the deck demo.
Back Deck
Deck demo, you ask? Yes, we had the deck replaced in February. I couldn’t stand to watch all that material go into a dumpster, and so I was salvaging whatever I could sneak into the basement when Mary-Jo wasn’t looking. Most of the structure was pressure-treated and the longer pieces were nailed together into beams, so I only saved a few 2x8s which were in decent shape. Adam and I took the railings down before the demo guys arrived; Adam didn’t want the 2×6 cedar handrails so I kept those, and he took the 2×4 lengths with aluminium uprights, and used them in a couple of railing applications at his place. The 1×6 cedar vertical facing also yielded lots of usable boards, some of which went into the outdoor plug shield mentioned earlier.
Camera Arm Mark II

When the deck team put up the new railings, they used pre-constructed lengths of aluminium rail, which they cut to length on site. That left aluminium scraps that looked really useful, and therefore pretty irresistible! You may recall a camera arm project from last year, which looked pretty but waved in the slightest breeze – not a desirable feature for something meant to hold a camera steady. Since then I have re-built this using square aluminium tubing that bears an uncanny resemblance to our deck railings. This one is pretty solid and it will probably feature in a future article.
Workshop re-org
In the workshop, you will recall I have built a few bits of “furniture” to hold specific tools. These are great, but each one takes up floor space. It’s got to the point where I don’t have enough floor space to organise the floor space. I can’t even put up the wood rack that MJ bought me to get the wood piles out of the way. My current plan is to abandon the idea of ever building a bathroom in the area adjoining the workshop (which was builder-roughed-in for the plumbing), and make that a storage area for materials. That will move some shelving units out of the main area, and use up some of the wood to build shelves and such.
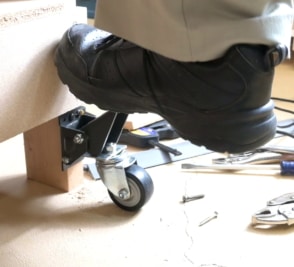
So the current chain of events required to progress is: remove the medicine cabinet in “Adam’s” bathroom, and put drywall in the resulting gap (done); put casters on the workbench so I can move it away from the wall (done); drywall the lower half of the area under the stairs, which is next to the bathroom rough-in (partially done) put a light in the new storage area so I can see what I’m doing (done); remove the clamps hanging on the stairwell wall; finish hanging drywall; mud the new drywall in the workshop and the bathroom; paint; design and build shelving; move the existing shelving units; store stuff in the new locations. I’m also hoping to get rid of a lot of “stuff” I’ve been saving for a rainy day in this process. Oh yes, I also need to put a light in the area under the stairs which will soon be closed off.
Almost 20 years ago, I put drywall on one long wall of the workshop and wired it with power and a bank of three switches. Two I used for lights in the main area, and the third was an unpowered switch wire that went across to the far wall to someday switch more lights on that side. Last month I finally used that for the light in the “washroom” space, and that light is now controlled by the main switch and a second one near that area. Long term planning finally came to fruition!
Shower
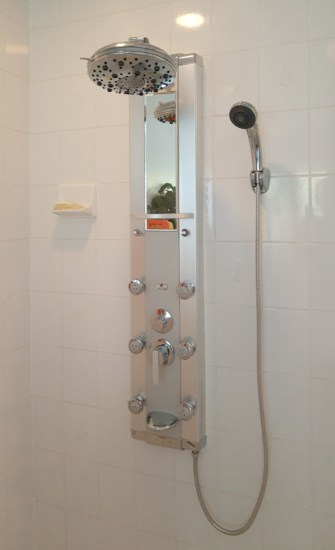
Another long delayed project was in our bathroom shower. Back in March 2013, the shiny chrome-like bits covering the metal controls of our shower started peeling off, and the manufacturer sent me replacement handles. That was great, but after loosening the grub screws, neither would come off. I asked for advice and they suggested drilling a hole. I replied that if that failed, I might be left with the water shut off to the entire house and a broken, possibly leaking, shower. They sent me a showroom model in June of 2013. So that’s not even ten years, right? Well, I was already knee-deep in silicone caulking replacement in that shower, so rather than waiting for the silicone to harden in the tube, which is the way I normally work, I bit the bullet and removed the old unit.
As it turned out, the hard part was (a) getting the old silicone to let go of the old unit and (b) scraping it all off the tiles so that new silicone caulking would stick. The shower wall is not as straight as the shower unit, so the unit touches the tiles near the top and is about 1/4″ away at the bottom. This was going to need a lot of caulk!
I ended up caulking the shower unit using two colours of caulk. I had almost a full tube of almond left from dong the join at the back of the kitchen sink, but only half a tube of white so I pumped some almond into the 1/4″ gap first. Then I mounted the white tube, which, interestingly enough, had already begun to dry in the (capped) spout, in only 6 days since doing the shower stall. So I had to hunt around quickly for something to dig it out with, so I could add the white before the almond skinned over. That ruined a delicate pair of nail scissors.
All went well until I was at the “fat” end of the last side, which of course was the visible one. It was getting harder to get any flow. That’s when I found out the caulk was squeezing out of the back of the tube rather than the spout. Yuk. So I finished it off with stuff I scraped out of the wrong end. By this time, everything was setting up, and the end result was very lumpy. Sealed, but ugly. Mrs. P was not impressed.
I was not impressed either, trying to clean up the caulk gun, which was a nice one abandoned because some previous owner had done the same thing. So, refurb the caulking gun.
I thought I was going to have to dig all the caulk out again, but home depot (who kindly returned my money for the first tube without any questions) suggested a caulk that would stick to existing caulk. Yippee! Only trouble was, it didn’t have a conventional spout, it had one that tooled as you went, which was fine if you wanted a 45 caulk bead, but I wanted an acute angle so the outer edge lined up top to bottom, even though the top touched and the bottom was 1/4″ away. And if I didn’t put on their spout, the tiny stump wouldn’t reach into the crack. That’s when my never-throw-anything-away habit paid off – I had a screw on spout that fit the thread of the new tube. I cut out some old caulk from the shower unit to get a clean line, and the new stuff went not too badly after that. It’s been a long road, but it’s done.
Outdoor Christmas decorations

I have been thinking for some time that I needed a way to reach into and past the centre of the swimming pool safety cover when I need to clear off leaves or whatever else shouldn’t be there. Both of our older pool skimmer poles broke recently and I think I can fix one, and the other may not be fixable, but it sure looks usable. What has this got to do with Xmas decorations? I’m coming to that. So there I was, tottering at the edge, reaching for the middle of the pool while holding the very end of the broom. And there was this long aluminium tube, loafing around, just waiting for someone to realize its utility. It worked out that the broom handle fits pretty well in the tube, and as the tube was a bit bent, the broom stuck in fairly well – well enough to keep the broom in while pulling the broom across the pool cover.
So that was the leaf problem sorted out, and (here it comes) I started to think about using the pole to extend my reach when putting the light strings on the spruce tree.
I’ve been using a window-washing pole which extends to 16’, but the darned trees are a lot taller than that. For several years now, I’ve been sitting atop a step ladder, waving the 16’ pole around attempting to get the end of the string to catch near the top of the tree. I was wondering if I could add the 10’ aluminium thingy to the existing pole. That was pretty much a non-starter, but it got me thinking about other long poles that were available, and the “roof-scraper” came to mind. This is three sections that join up with a plastic vertical scraper that fits on the end. It’s for removing snow that builds up near the eaves troughs. These rods are similar in diameter to the broom handle, and already had a hole drilled in them for the pop-out button that fixes them together, so a ¼” hole drilled in the pool pole let me put a bolt through the pole and rod. Adding a plastic collar wrapped in vinyl tape to the rod made for a tighter fit. Cutting the plastic to length made for a very graphic reminder for why it’s a bad idea to cut anything when the holding hand is in the path of the cut, but that’s healing nicely, thank you.

I used several cut-offs from the end of metal studs, hammered flat, to fabricate a “U” shaped hook which fitted the top end of the rods, slipping on and secured by the existing pop-out button popping into a hole I provided. So now I had a pole 30+ feet long. OK, so it’s not easy to hook a 30’ pole onto a light string and then bring it vertical, but I managed, and used the long pole for the top 3-4 feet of the tree, without having to do my circus act at the top of a ladder.
Oh yes, I found the little platform I’d used last year for standing on a sloping roof and being able to reach the eaves trough to clip the lights on. Last year I was smart enough to write on it that it needed to be higher, and by how much. Unfortunately, even given a whole year for implementation, I was not smart enough to actually make those changes, or to put the platform some place where I could find it. I mean, who would expect that something that needed fixing would be left sitting on the workbench?
Chips off the old block

Our basketball net had long ago succumbed to the pressures of teenaged boys hanging on it, and it was not only no longer used, but no longer straight. Adam helped me remove the top part earlier in the year, but the concrete foundation and about three feet of post were still there.
I had some thoughts about pulling the whole thing out of the ground (which was why I’d left some post for pulling and shoving) but the more I thought about it the less I thought this was possible. So I’m going for flattening the concrete off, cutting the post (which, of course was filled with concrete to make it more permanent) and making the spot a base for something like a planter.
Chipping away concrete is not easy. At first I thought that cutting a line with a diamond saw would allow me to put in a stone chisel and break off huge chunks. Nope. After much cutting and hammering, I found that making cuts about an inch apart, and then the same at right angles would allow me to chisel off a single cubic inch at a time. This project is on hold until I get inspire to try some more. The least I want to do is make some more cuts before winter, so water can freeze in the cracks and possibly save me some chiselling!


Following up on past projects
Finally, The DVD organization project has mostly come to a conclusion, with the writing of the database application and data entry. (There’s always something that I want to change in any program that I write!) The hard part was getting the information (like year made and run time) and doing all the typing. Now I can find any DVD quickly, and check the database for a movie that I’ve rated well, haven’t seen in three years and is less than two hours long, because I always decide to watch a movie too late in the evening.